When I first saw the iPad concept I thought "yeah yeah, done before and was never really successful then" there have been tablet PCs on the market for a long time now but they never really seemed to capture the imagination of the buying public at large. It's not so much the concept that was at fault but much more the implementation. For the tablets to work, the operating system has to be optimized for that environment. the first thing that struck me about the iPad was the choice of OS; like many I was expecting a cut down version of OSX and was extremely surprised (initially) to learn the iPhone OS was the chosen vehicle. But, after a little cool headed consideration, this choice made sense. After using the device for a few days I have to say the choice was inspired!
I've owned just about every type of processing platform since the release of Sinclair's ZX80 many years ago. I've tried many mobile computing devices from laptops to the first Palm Pilots. All claimed to be life changing objects, all claimed to reinvent the way I lived and worked on the move. None really delivered on the promise until the iPhone arrived. (although laptops did, of course provide comprehensive computing anywhere) Well now we have the iPad and, for the first time, I really do believe we have something revolutionary. I'm typing this Blogpost on my my new shiney smooth wonder and the whole experience is a complete joy. I'm not going to provide a review of the device as many already exist; suffice it to say I'm a convert. I was initially a sceptic and tried to find many reasons why it just wouldn't work for me but the simple truth is I was wrong, the iPad is simply brilliant!
- Posted using BlogPress from my iPad
Tuesday, 1 June 2010
Tuesday, 6 October 2009
Leading lines
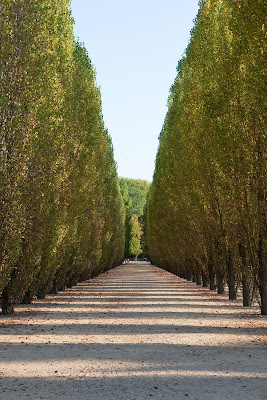
I was browsing through some of the images I brought back from my recent weekend in Paris and it struck me how often I rely on a tried and tested compositional tool. As I looked through my images, it was obvious that my eye is naturally drawn to subjects that benefit from the principle of leading lines. The image below is a classic example of this simple principle. In this image, the eye is naturally drawn to the end of the avenue by the lines formed by the trunks of the poplars and the converging lines formed by the tree tops. It almost doesn't matter what the subject is, by using lines to bring the eye to the desired location always seems to form a pleasing image. In order to exagerate this effect, the end of the avenue also sits in a good compositional position
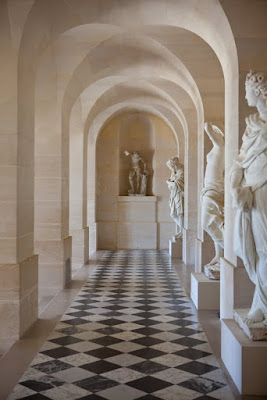
 Leading lines once again perform an important role in the structure and dynamic of the image below. The convergence of the lines of the floor tiles combined with the centres of the arches and their columns, serve to draw the eyes to the statue in the alcove at the end.
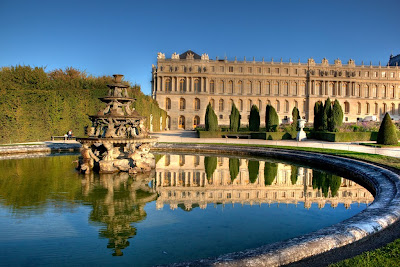
Leading lines are a really powerful tool and they don't have to be straight. The image below isn't a favourite by any stretch of the imagination, however it certainly shows how a curved line formed by the bank of the pool provides a strong leading line.
If you take a look at the post before this one, I've even framed the example image to take advantage of strong leading lines. The more images I look at, the more I realise how much i look for this sort of structure unconciously.
Keep a look out for examples when ever you're taking pictures; pathways, fences, piers, coast lines and many other simple structures can provide great lines that really bring an image to life.
 Leading lines once again perform an important role in the structure and dynamic of the image below. The convergence of the lines of the floor tiles combined with the centres of the arches and their columns, serve to draw the eyes to the statue in the alcove at the end.
Leading lines are a really powerful tool and they don't have to be straight. The image below isn't a favourite by any stretch of the imagination, however it certainly shows how a curved line formed by the bank of the pool provides a strong leading line.

If you take a look at the post before this one, I've even framed the example image to take advantage of strong leading lines. The more images I look at, the more I realise how much i look for this sort of structure unconciously.
Keep a look out for examples when ever you're taking pictures; pathways, fences, piers, coast lines and many other simple structures can provide great lines that really bring an image to life.
Wednesday, 30 September 2009
Cheating with HDR images
I spent the weekend just passed in Paris and took my wonderful Canon 5D Mk II DSLR with me. Whilst their I was able to visit the astonishing Palace of Versielles and it's amazing gardens. It's difficult to do justice to the magificence of Versielles in a short blog post and a few photos so, if you get the chance, it's a place you must visit!
One of the challenges when capturing images inside buildings like the palace lies in the huge range in tones one encounters. The difference in brightness between the brightest sunlit highlights and the darkest shadows is enormous, way beyond the daynamic range of even the most sophisticated DSLR. This issue not only affects the camera used to capture the image, it also affects the display an image is viewed on or the printer used to record it for posterity. The human eye also has a limited dynamic range (not as limited as our trusty electronics) but the brain plays a remarkable role in seamlessly processing detail in shadows and in the highlights as the eye continuously adjusts the amount of light it admits. cameras, displays and printers clearly cannot do this!
A great approach to dealing with wide dynamic range situations is a techniques called High Dynamic Range (HDR) image creation. An HDR image is really a mixture of three or more images at different exposure levels (optimal exposure, under exposure and over exposure) The idea here is that the underexposed image reveals details in the highlights that would otherwise be lost while the over exposed image reveals hidden detail in the shadows. A piece of software takes these differently exposed images and maps their details into the the dynamic range of a single image. in other words, you end up with a picture that has the best representation of detail right across the dynamic range in the original scene, albeit squashed into the range of darks and lights that can be rendered on your PC's display or with your printer's inks.
There are a number of different tools available for creating HRD images, Photoshop has one built in. I like Photomatix Pro but as I said, there are many available. The standard approach with all of them involves providing three or more differently exposed images. Now the optimium way to do this is to capture three different images using a tripod mounted camera. the problem is, when you're walking around a major landmark with several thousand people, it's not always possible to take the time required to set your equipment up and a single hand held shot is all that is available. Never fear! As long as you shoot RAW, all is not lost and this is where the cheat comes in.
RAW images contain a great deal of detail. As such it's possible to reproduce the effect of over and under exposeure pretty accurately through your RAW conversion programme. I'm using LightRoom but the same process is available in all RAW converters. Simply set the exposure value in the converter to -1.5 stops, 0 stops and +1.5 stops and save these as three separate .tiff files. These files can then be loaded into your favourite HDR image generator and a final image created. I'll cover the actual technique used within the HDR tool in another post but for now, the results can be seen below...

Thursday, 10 September 2009
Photoshop's coolest tool
It's been a while since I last blogged, I've found that e-mail, Twitter, Instant messaging and plane old human interaction take up a lot of time. Add to this the need to work 12 hours a day to earn a living and there's not much time for much else! Anyway, as the Autumn nights begin to draw in, I plan to make a real effort to produce more material, including tutorials over the next weeks and months. With that in mind, I'm going to start with a Photoshop tutorial and, in the spirit of extreme laziness, it's not one of mine :-)
The Vanishing point filter introduced in Photoshop CS3 is one of the most powerful tools in Adobe's falagship's already impressive armoury. The Vanishing point filter allows you to manipulate images (adding components, moving objects, removing unwanted distractions) while taking account of the images perspective. As I mentioned, the tutorial is not mine, but this excelent two part submission will give you a great insight into its unique capabilities...
The Vanishing point filter introduced in Photoshop CS3 is one of the most powerful tools in Adobe's falagship's already impressive armoury. The Vanishing point filter allows you to manipulate images (adding components, moving objects, removing unwanted distractions) while taking account of the images perspective. As I mentioned, the tutorial is not mine, but this excelent two part submission will give you a great insight into its unique capabilities...
Monday, 3 August 2009
The Canon 5D Mark II and a puppy
For one reason and another my blog has been woefully neglected over the last month or so. The same goes for my beloved 5D Mark II. The arrival of two eight week old Jack Russell puppies gave me an opportunity to give the new body a brief initial test drive. I coupled it to my 70-200mm f2.8 L IS lens and started to get to know this incredible feat of image capture technology.

Now these guys are clearly seriously cute but, squirming puppies make critical focus at wide apertures very tricky...
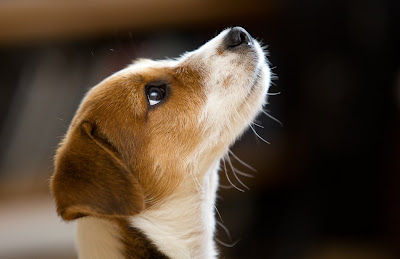
I love the way the 5D Mark II captures colour and detail. Although these images have been published using Lightroom and Photoshop, this was only in order to provide RAW conversion and cropping. Everything else is pretty much as-shot...

I did notice that my focus was very slightly off when the puppies were static. I have subsequently modified the micro-focus adjustment for this lens on my 5D Mk II body and it is now pin sharp every time.
All together now... AAAAHHHHHHH !!!!
Wednesday, 24 June 2009
Hot pixels spoilt my day...
Last week I received my much anticipated Canon 5D Mark II camera body. As soon as I had the opportunity I eagerly unpacked the unit, attached my favourite L series lens (70-200 mm f2.8 IS L) and started playing. Let me say before I go any further this camera is simply incredible! the issues I have faced are specific to my unit and just bad luck. So first the good news...
The 5D Mark II is a 21M pixel full frame digital SLR that also supports full HD video capture at 1080p. The latest firmware (version 1.1) offers full manual exposure control over said video so this product now becomes one of the most useful and flexible image capture tools on the market. Now I'm a stills guy, I've never really explored video but the 5D Mark II will almost certainly change all that. From a stills point of view, it is a joy to use. The colour rendition is fantastic with a rich accurate palette, the sensor yields fantastic detail (when coupled with the right optics) and the high ISO noise control is simply incredible.
With my old 5D I would shoot at ISO 800 if the need arose but would never really consider ISO 1600 due to noise and the loss of detail that would always result in post production. With the 5d Mark II I set ISO to 1600, shot a few frames and was simply blown away by the cleanliness and usability of the frames, they were fantastic! I pushed the ISO up to 4000 and found I could still get perfectly usable results requiring very little post processing! This will revolutionise my wedding photography and the ability to capture those all important candids in low light situations. Simply amazing!
Now one check I always perform on a new camera body is the hot pixel check. The HP check is pretty simple, all you do is place the lens cap on your lens in order to exclude all light, set the ISO at a suitable mid point (I chose ISO 800) and take a longish exposure (30 secs). Now look at the captured image at 100% and it should appear uniformly black, at least on the 5D Mark II. On other cameras that don't enjoy the same high ISO performance as the 5D MK II some noise may be visible, this will take the form of faint mutli-coloured mottling but it should be pretty uniform across the frame, this is normal and not an indication of an issue. In my case, I was checking for "hot" pixels. These often result from small manufacturing errors in the production of the camera's sensors but can also indicate other more worrying issues. To my horror, when I examined my hot Pixel frame, I found somewhere between 8 and 15 instances where the pixel was glowing either white, red of blue. These pixels remain "hot" from frame to frame and could be visible on dark areas of an image, especially when attempting astro-photography. They can also be a problem on dark video scenes where the removal would represent a great deal of work. In the image below I have circled some of the most obvious pixels as they won't show up on the compressed image allowed by Blogger.
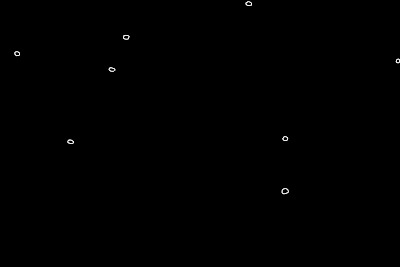
The Eight examples circled here were the eight brightest, you can see they are distributed uniformly across the frame.
So why should you worry? After all, 8 pixels in 21 million is a very low percentage, what's the problem? Well consider the following...
- this is a £2000 camera body!
- On normal daytime shots, these blemishes would be unlikely to show up. On night shots, Astro photography or video footage of dark scenes, they certainly would.
- It's a real pain having to remove blemishes from every frame you ever shoot!
- Blemishes of this type suggest a problem in the quality assurance stage from this manufacturing batch, there could be other hidden problems.
- Errors in the production of the sensor could be a one-time problem but they could also indicate a sensor with degenerative problems leading to further, significant degradation.
- When I contacted Canon to discuss the issue, they felt it was a problem and a replacement would be required
Thursday, 11 June 2009
The mysteries of exposure
I was asked recently to explain exposure, not in the Antarctic sense you'll understand but photographic exposure. This post will try to take this question on and represent another chapter in the set of photographic how-tos and tutorials I've stumbled happily into writing. This is a big subject and this is a longer post than I intended so please bare with me...
Although many would-be photographers use simple point and shoot compact cameras, more and more now buy one of the many affordable digital SLR cameras on the market. Unfortunately many SLR owners, having gone to the additional expense of buying one, leave it in auto mode and end up with essentially the same shots they could have captured with a simpler system. An understanding of exposure and its control opens up a world of many possibilities and creative opportunities otherwise denied by auto mode. you can find an explanation of the limitations of a camera's auto mode in this earlier post.
So exposure, what does it really mean? As with most things in photography, this question has both a technical and an artistic response, for the rest of this post I'll focus on the control of exposure and come back to its artistic use in another post. The simplest definition of exposure is the process of controling the amount of light that is captured by by a camera's digital sensor or film frame. It's the variations in light and dark (highlights and shadows) that form an image and both digital sensor and film have the capability to capture a certain number of different degrees of light and dark (tones). The range of distinguishable tones that can be captured between the darkest shadows (black) and the lightest highlights (white) is called the dynamic range. All digital camera sensors have a defined dynamic range as does photographic film. The greater the dynamic range, the larger the number of light and dark tones that can be captured and, therefore, the more detail that can be represented.
So that was all very interesting but how does it relate to exposure? For the rest of this discussion I'm going to discuss digital cameras but the principles extend to all photographic equipment including video. The dynamic range of a digital camera's sensor defines the range of tones that can be captured between the darkest shadows and the brightest highlights. If the amount of light captured in part of a scene is brighter or darker than the limits of the sensors dynamic range, that part of the scene will appear as a featureless area of white or black. In this case we say there's no detail in the highlights or shadows respectively and this is often referred to as "clipping".
When we control exposure we are controling where important tones in the image sit within the dynamic range of the camera's sensor. Your camera's histogram, the graph-like image that can be enabled on most cameras, is the best way to visualise the exposure of any image (apart from the image itself).


It gives a view of the pixels in the image plotted against brightness levels. The more pixels to the right of the image, the brighter the overall scene and vice versa when the greater concentration is to the left. For a more detailed explanation of the histogram, take a look at this link. Now there's no such thing as the "perfect" histogram. The distribution of the pixels between tones depends entirely on the nature of the image. Imagine a wide angle photograph of a bride against the dark night sky. Since it's wide angle, the bride would occupy a small percentage of the image. Assuming she's wearing a white dress, and we want to see it against the inky black night sky, the histogram of the shot would show a small group of pixcels to the right (the bride's dress) and a large group of pixels to the left (the night sky) with nothing in the middle. This would be a perfectly acceptable histogram for that scene. The point here is the histogram can be used to quickly and accurately assess if the exposure used actually captured the scene the photographer wanted.
Exposure control means ensuring the things that are highlights, mid tones and shadows are where we would expect them to be in the histogram for any particular image. So what's involved in it's control? Discounting flash for a moment, there are three key elements to exposure control, the photographers's holy trinity if you like - Aperture, Shutter speed and ISO value.
Aperture
The aperture of a lens describes how "open" it is and, therefore, how much light can enter the camera while the shutter is open. Aperture is often expressed as a "f" number e.g f2.8, f4, f5.6 and so on. These curious numbers describe the ratio of the lens' focal length to the width of the opening controlled by the lens diaphragm. In other words a 100mm lens set to f4 will have an aperture opening 25mm wide (100 / 25 = 4). The lower the f number the wider the aperture. It's for this reason that very fast (f4 and above) long lenses used by sports photographers are so large, heavy and expensive. Consider a 600mm lens at f4, it would have to have an opening of at least 15cm (6inches) and this would be the minimum width of the main glass element! Photographers ususally vary the aperture value in order to control the Depth Of Field (DOF) of the image, DOF is explained in detail here...
Shutter Speed
No surprises here, whilst aperture defines the width of the opening, shutter speed determines how long the sensor is exposed to the light entering the lens. The longer the shutter is open the more light can enter. Photographers vary the shutter speed for a range of reasons. very often, in hand held candid shots for example, we try to select the fastest shutter speed we can in order to minimise camera shake. On some occasions, we want a slower shutter speed so the feeling of motion and movement can be introduced. We do this by the deliberate blurring of moving subjects against a sharp stationary background. or by panning with a moving object keeping it sharp whilst blurring the background scene. In these cases a slower shutter speed is required.
ISO
The ISO value determines the sensitivity of the camera's sensor to light. The higher the ISO value, the more sensitive the sensor is to the light falling upon it and the more detail can be captured for a given aperture setting or shutter speed. The ISO value is typically modified in order to preserve a given combination of shutter speed and aperture in lower light situations. Imagine you're taking a wedding shot in a church with subdued lighting. Even with the aperture wide open at say f2.8. you may be left with a shutter speed of 1/15th sec which would risk the introduction of camera shake. Assuming the current ISO value was 100, setting it to 800 would realise a shutterspeed of 1/125th sec as the sensor will be 8 times (3 stops) more sensitive. There is however an important note of caution, increasing the ISO value will increase the amount of "noise" captured in the image. When the ISO value is increased, the sensor, which converts light falling upon it into electrical signals, amplifies those signals. As with all cases of amplification, random noise is amplified with the signal and can become significant (more on this in another post).
Aperture, Shutter speed and ISO are very closely linked. For any given exposure setting, say f5.6 at 1/250th sec at ISO 100, if I vary one of the values up, and another down by the same amount I will maintain the same exposure! Now at this point I need to explain how the width of the opening of a lens and the time it is open or the sensitivity of the sensor can be varied by the "same amount" when they are entirely different parameters. I need to introduce the notion of the "f stop".
Every time I double the amount of light I allow into my camera, I add 1 "stop" to the exposure. Now I can double the amount of light by controling the three values we have just described. If I open the shutter for 1/125th sec instead of 1/250th it is open twice as long so twice as much light enters the camera. I've therefore changed the shutter speed by 1 stop. If I open the aperture wider to f4 (f4 admits twice as much light as f5.6 and an explanation of why can be found here) I have doubled the amount of light that can be collected by the camera for any given shutter speed, I have opened the Aperture by 1 stop. If I double the sensitivity of my sensor say from ISO 100 to 200 I have increased the sensitivity to light by 1 stop. This is pretty cool, I have a single unit of measure that can describe three completely different values. the reality is deceptive, although the parameters are very different, they are all affecting the amount of light captured in an image and it is this value that we are actually varying and measuring. See here for a more complete explanation...
When setting up a shot it is the combination of Aperture, Shutter Speed and ISO values that determine the overall exposure of the image. So how do I decide which settings to use? Firstly, if your camera supports manual override (M) it probably also supports Aperture priority (AV) and Shutter Speed priority (TV). If you set your camera to (M) you probably have a view of your camera's lightmeter in the viewfinder. It's typically the case that the meter represents a good exposure by indicating a point in the middle of a scale. If the meter is pointing to the right of centre, it's suggesting over exposure and if it's to the left, under exposure.
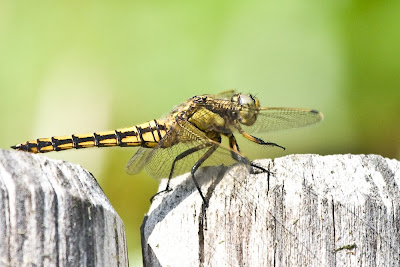
Consider the image of the dragon fly landing on a small, weathered wooden fence. There were a number of considerations driving the choice of settings in this image. firstly, being an unpredictable insect I had to choose a fast shutter speed to stand any chance of capturing a sharp image. Secondly, as I was using a long focal length lens, it has a maximum aperture of f5.6 at full zoom . I therefore had to increase the ISO valuer to 400 in order to get the fast shutter speed I needed for the aperture I was forced to use.
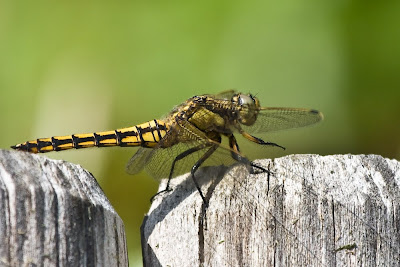
 The combination of settings in this image delivers histogram that acurately positions the highlites to the right and the shadows to the left without an clipping (pixels bunched up at the edges) leading to lost detail.
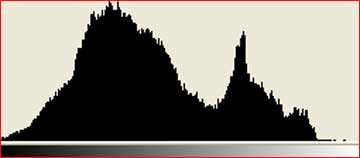
Had I chosen a shutter speed 1 stop slower than the settings above, the image would have been over exposed by 1 stop as in the image below (note the histogram is bunched up to the right hand side with much of the detail beyond the limit of the sensor (clipped) these are the very bright areas of the fence that have no or little detail in them)
 If i'd chosen a shutter speed that was too fast, say 1 stop faster, I would have ended up with the under exposed image below. (note how the pixel distribution has shifeted to the left of the histogram indicating darker tones make up the bulk of the image. We are aslo beginning to lose detail in the legs and the body of the Dragon Fly)
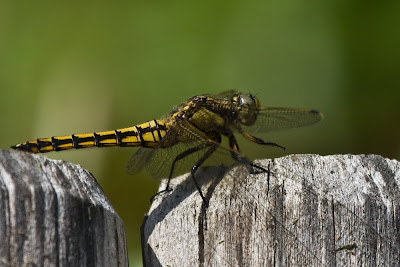
 This image and the choice of settings demonstrate the linkage between the three exposure parameters. In this case, to get the shutter speed I wanted at the maximum aperture I had available to me I actually modified the ISO value!
This was a long post and I have only scratched the surface of this subject. there will be more to come in future posts. In the meantime, try activating the histogram on your camera and watch the effect of different combinations of settings on the histogram and, more importantly, your images.
Although many would-be photographers use simple point and shoot compact cameras, more and more now buy one of the many affordable digital SLR cameras on the market. Unfortunately many SLR owners, having gone to the additional expense of buying one, leave it in auto mode and end up with essentially the same shots they could have captured with a simpler system. An understanding of exposure and its control opens up a world of many possibilities and creative opportunities otherwise denied by auto mode. you can find an explanation of the limitations of a camera's auto mode in this earlier post.
So exposure, what does it really mean? As with most things in photography, this question has both a technical and an artistic response, for the rest of this post I'll focus on the control of exposure and come back to its artistic use in another post. The simplest definition of exposure is the process of controling the amount of light that is captured by by a camera's digital sensor or film frame. It's the variations in light and dark (highlights and shadows) that form an image and both digital sensor and film have the capability to capture a certain number of different degrees of light and dark (tones). The range of distinguishable tones that can be captured between the darkest shadows (black) and the lightest highlights (white) is called the dynamic range. All digital camera sensors have a defined dynamic range as does photographic film. The greater the dynamic range, the larger the number of light and dark tones that can be captured and, therefore, the more detail that can be represented.
So that was all very interesting but how does it relate to exposure? For the rest of this discussion I'm going to discuss digital cameras but the principles extend to all photographic equipment including video. The dynamic range of a digital camera's sensor defines the range of tones that can be captured between the darkest shadows and the brightest highlights. If the amount of light captured in part of a scene is brighter or darker than the limits of the sensors dynamic range, that part of the scene will appear as a featureless area of white or black. In this case we say there's no detail in the highlights or shadows respectively and this is often referred to as "clipping".
When we control exposure we are controling where important tones in the image sit within the dynamic range of the camera's sensor. Your camera's histogram, the graph-like image that can be enabled on most cameras, is the best way to visualise the exposure of any image (apart from the image itself).

It gives a view of the pixels in the image plotted against brightness levels. The more pixels to the right of the image, the brighter the overall scene and vice versa when the greater concentration is to the left. For a more detailed explanation of the histogram, take a look at this link. Now there's no such thing as the "perfect" histogram. The distribution of the pixels between tones depends entirely on the nature of the image. Imagine a wide angle photograph of a bride against the dark night sky. Since it's wide angle, the bride would occupy a small percentage of the image. Assuming she's wearing a white dress, and we want to see it against the inky black night sky, the histogram of the shot would show a small group of pixcels to the right (the bride's dress) and a large group of pixels to the left (the night sky) with nothing in the middle. This would be a perfectly acceptable histogram for that scene. The point here is the histogram can be used to quickly and accurately assess if the exposure used actually captured the scene the photographer wanted.
Exposure control means ensuring the things that are highlights, mid tones and shadows are where we would expect them to be in the histogram for any particular image. So what's involved in it's control? Discounting flash for a moment, there are three key elements to exposure control, the photographers's holy trinity if you like - Aperture, Shutter speed and ISO value.
Aperture
The aperture of a lens describes how "open" it is and, therefore, how much light can enter the camera while the shutter is open. Aperture is often expressed as a "f" number e.g f2.8, f4, f5.6 and so on. These curious numbers describe the ratio of the lens' focal length to the width of the opening controlled by the lens diaphragm. In other words a 100mm lens set to f4 will have an aperture opening 25mm wide (100 / 25 = 4). The lower the f number the wider the aperture. It's for this reason that very fast (f4 and above) long lenses used by sports photographers are so large, heavy and expensive. Consider a 600mm lens at f4, it would have to have an opening of at least 15cm (6inches) and this would be the minimum width of the main glass element! Photographers ususally vary the aperture value in order to control the Depth Of Field (DOF) of the image, DOF is explained in detail here...
Shutter Speed
No surprises here, whilst aperture defines the width of the opening, shutter speed determines how long the sensor is exposed to the light entering the lens. The longer the shutter is open the more light can enter. Photographers vary the shutter speed for a range of reasons. very often, in hand held candid shots for example, we try to select the fastest shutter speed we can in order to minimise camera shake. On some occasions, we want a slower shutter speed so the feeling of motion and movement can be introduced. We do this by the deliberate blurring of moving subjects against a sharp stationary background. or by panning with a moving object keeping it sharp whilst blurring the background scene. In these cases a slower shutter speed is required.
ISO
The ISO value determines the sensitivity of the camera's sensor to light. The higher the ISO value, the more sensitive the sensor is to the light falling upon it and the more detail can be captured for a given aperture setting or shutter speed. The ISO value is typically modified in order to preserve a given combination of shutter speed and aperture in lower light situations. Imagine you're taking a wedding shot in a church with subdued lighting. Even with the aperture wide open at say f2.8. you may be left with a shutter speed of 1/15th sec which would risk the introduction of camera shake. Assuming the current ISO value was 100, setting it to 800 would realise a shutterspeed of 1/125th sec as the sensor will be 8 times (3 stops) more sensitive. There is however an important note of caution, increasing the ISO value will increase the amount of "noise" captured in the image. When the ISO value is increased, the sensor, which converts light falling upon it into electrical signals, amplifies those signals. As with all cases of amplification, random noise is amplified with the signal and can become significant (more on this in another post).
Aperture, Shutter speed and ISO are very closely linked. For any given exposure setting, say f5.6 at 1/250th sec at ISO 100, if I vary one of the values up, and another down by the same amount I will maintain the same exposure! Now at this point I need to explain how the width of the opening of a lens and the time it is open or the sensitivity of the sensor can be varied by the "same amount" when they are entirely different parameters. I need to introduce the notion of the "f stop".
Every time I double the amount of light I allow into my camera, I add 1 "stop" to the exposure. Now I can double the amount of light by controling the three values we have just described. If I open the shutter for 1/125th sec instead of 1/250th it is open twice as long so twice as much light enters the camera. I've therefore changed the shutter speed by 1 stop. If I open the aperture wider to f4 (f4 admits twice as much light as f5.6 and an explanation of why can be found here) I have doubled the amount of light that can be collected by the camera for any given shutter speed, I have opened the Aperture by 1 stop. If I double the sensitivity of my sensor say from ISO 100 to 200 I have increased the sensitivity to light by 1 stop. This is pretty cool, I have a single unit of measure that can describe three completely different values. the reality is deceptive, although the parameters are very different, they are all affecting the amount of light captured in an image and it is this value that we are actually varying and measuring. See here for a more complete explanation...
When setting up a shot it is the combination of Aperture, Shutter Speed and ISO values that determine the overall exposure of the image. So how do I decide which settings to use? Firstly, if your camera supports manual override (M) it probably also supports Aperture priority (AV) and Shutter Speed priority (TV). If you set your camera to (M) you probably have a view of your camera's lightmeter in the viewfinder. It's typically the case that the meter represents a good exposure by indicating a point in the middle of a scale. If the meter is pointing to the right of centre, it's suggesting over exposure and if it's to the left, under exposure.
Consider the image of the dragon fly landing on a small, weathered wooden fence. There were a number of considerations driving the choice of settings in this image. firstly, being an unpredictable insect I had to choose a fast shutter speed to stand any chance of capturing a sharp image. Secondly, as I was using a long focal length lens, it has a maximum aperture of f5.6 at full zoom . I therefore had to increase the ISO valuer to 400 in order to get the fast shutter speed I needed for the aperture I was forced to use.

 The combination of settings in this image delivers histogram that acurately positions the highlites to the right and the shadows to the left without an clipping (pixels bunched up at the edges) leading to lost detail.
Had I chosen a shutter speed 1 stop slower than the settings above, the image would have been over exposed by 1 stop as in the image below (note the histogram is bunched up to the right hand side with much of the detail beyond the limit of the sensor (clipped) these are the very bright areas of the fence that have no or little detail in them)

 If i'd chosen a shutter speed that was too fast, say 1 stop faster, I would have ended up with the under exposed image below. (note how the pixel distribution has shifeted to the left of the histogram indicating darker tones make up the bulk of the image. We are aslo beginning to lose detail in the legs and the body of the Dragon Fly)
 This image and the choice of settings demonstrate the linkage between the three exposure parameters. In this case, to get the shutter speed I wanted at the maximum aperture I had available to me I actually modified the ISO value!
This was a long post and I have only scratched the surface of this subject. there will be more to come in future posts. In the meantime, try activating the histogram on your camera and watch the effect of different combinations of settings on the histogram and, more importantly, your images.
Subscribe to:
Posts (Atom)


