Tuesday 6 October 2009

Leading lines

I was browsing through some of the images I brought back from my recent weekend in Paris and it struck me how often I rely on a tried and tested compositional tool. As I looked through my images, it was obvious that my eye is naturally drawn to subjects that benefit from the principle of leading lines. The image below is a classic example of this simple principle. In this image, the eye is naturally drawn to the end of the avenue by the lines formed by the trunks of the poplars and the converging lines formed by the tree tops. It almost doesn't matter what the subject is, by using lines to bring the eye to the desired location always seems to form a pleasing image. In order to exagerate this effect, the end of the avenue also sits in a good compositional position

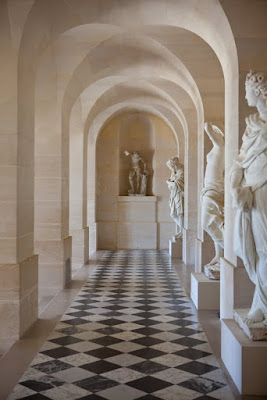
Leading lines once again perform an important role in the structure and dynamic of the image below. The convergence of the lines of the floor tiles combined with the centres of the arches and their columns, serve to draw the eyes to the statue in the alcove at the end.


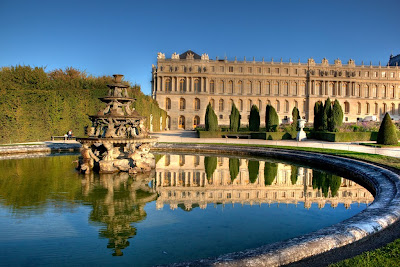
Leading lines are a really powerful tool and they don't have to be straight. The image below isn't a favourite by any stretch of the imagination, however it certainly shows how a curved line formed by the bank of the pool provides a strong leading line
.


If you take a look at the post before this one, I've even framed the example image to take advantage of strong leading lines. The more images I look at, the more I realise how much i look for this sort of structure unconciously.

Keep a look out for examples when ever you're taking pictures; pathways, fences, piers, coast lines and many other simple structures can provide great lines that really bring an image to life.

Wednesday 30 September 2009

Cheating with HDR images

I spent the weekend just passed in Paris and took my wonderful Canon 5D Mk II DSLR with me. Whilst their I was able to visit the astonishing Palace of Versielles and it's amazing gardens. It's difficult to do justice to the magificence of Versielles in a short blog post and a few photos so, if you get the chance, it's a place you must visit!

One of the challenges when capturing images inside buildings like the palace lies in the huge range in tones one encounters. The difference in brightness between the brightest sunlit highlights and the darkest shadows is enormous, way beyond the daynamic range of even the most sophisticated DSLR. This issue not only affects the camera used to capture the image, it also affects the display an image is viewed on or the printer used to record it for posterity. The human eye also has a limited dynamic range (not as limited as our trusty electronics) but the brain plays a remarkable role in seamlessly processing detail in shadows and in the highlights as the eye continuously adjusts the amount of light it admits. cameras, displays and printers clearly cannot do this!

A great approach to dealing with wide dynamic range situations is a techniques called High Dynamic Range (HDR) image creation. An HDR image is really a mixture of three or more images at different exposure levels (optimal exposure, under exposure and over exposure) The idea here is that the underexposed image reveals details in the highlights that would otherwise be lost while the over exposed image reveals hidden detail in the shadows. A piece of software takes these differently exposed images and maps their details into the the dynamic range of a single image. in other words, you end up with a picture that has the best representation of detail right across the dynamic range in the original scene, albeit squashed into the range of darks and lights that can be rendered on your PC's display or with your printer's inks.

There are a number of different tools available for creating HRD images, Photoshop has one built in. I like Photomatix Pro but as I said, there are many available. The standard approach with all of them involves providing three or more differently exposed images. Now the optimium way to do this is to capture three different images using a tripod mounted camera. the problem is, when you're walking around a major landmark with several thousand people, it's not always possible to take the time required to set your equipment up and a single hand held shot is all that is available. Never fear! As long as you shoot RAW, all is not lost and this is where the cheat comes in.


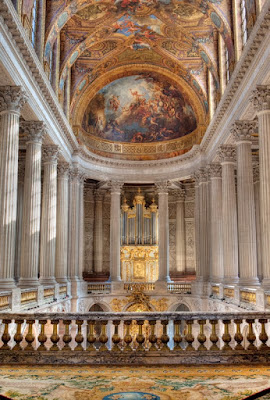
RAW images contain a great deal of detail. As such it's possible to reproduce the effect of over and under exposeure pretty accurately through your RAW conversion programme. I'm using LightRoom but the same process is available in all RAW converters. Simply set the exposure value in the converter to -1.5 stops, 0 stops and +1.5 stops and save these as three separate .tiff files. These files can then be loaded into your favourite HDR image generator and a final image created. I'll cover the actual technique used within the HDR tool in another post but for now, the results can be seen below...


Thursday 10 September 2009

Photoshop's coolest tool

It's been a while since I last blogged, I've found that e-mail, Twitter, Instant messaging and plane old human interaction take up a lot of time. Add to this the need to work 12 hours a day to earn a living and there's not much time for much else! Anyway, as the Autumn nights begin to draw in, I plan to make a real effort to produce more material, including tutorials over the next weeks and months. With that in mind, I'm going to start with a Photoshop tutorial and, in the spirit of extreme laziness, it's not one of mine :-)

The Vanishing point filter introduced in Photoshop CS3 is one of the most powerful tools in Adobe's falagship's already impressive armoury. The Vanishing point filter allows you to manipulate images (adding components, moving objects, removing unwanted distractions) while taking account of the images perspective. As I mentioned, the tutorial is not mine, but this excelent two part submission will give you a great insight into its unique capabilities...

Monday 3 August 2009

The Canon 5D Mark II and a puppy

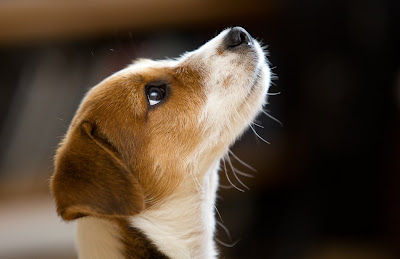
For one reason and another my blog has been woefully neglected over the last month or so. The same goes for my beloved 5D Mark II. The arrival of two eight week old Jack Russell puppies gave me an opportunity to give the new body a brief initial test drive. I coupled it to my 70-200mm f2.8 L IS lens and started to get to know this incredible feat of image capture technology.


Now these guys are clearly seriously cute but, squirming puppies make critical focus at wide apertures very tricky...


I love the way the 5D Mark II captures colour and detail. Although these images have been published using Lightroom and Photoshop, this was only in order to provide RAW conversion and cropping. Everything else is pretty much as-shot...


I did notice that my focus was very slightly off when the puppies were static. I have subsequently modified the micro-focus adjustment for this lens on my 5D Mk II body and it is now pin sharp every time.

All together now... AAAAHHHHHHH !!!!

Wednesday 24 June 2009

Hot pixels spoilt my day...

Last week I received my much anticipated Canon 5D Mark II camera body. As soon as I had the opportunity I eagerly unpacked the unit, attached my favourite L series lens (70-200 mm f2.8 IS L) and started playing. Let me say before I go any further this camera is simply incredible! the issues I have faced are specific to my unit and just bad luck. So first the good news...

The 5D Mark II is a 21M pixel full frame digital SLR that also supports full HD video capture at 1080p. The latest firmware (version 1.1) offers full manual exposure control over said video so this product now becomes one of the most useful and flexible image capture tools on the market. Now I'm a stills guy, I've never really explored video but the 5D Mark II will almost certainly change all that. From a stills point of view, it is a joy to use. The colour rendition is fantastic with a rich accurate palette, the sensor yields fantastic detail (when coupled with the right optics) and the high ISO noise control is simply incredible.

With my old 5D I would shoot at ISO 800 if the need arose but would never really consider ISO 1600 due to noise and the loss of detail that would always result in post production. With the 5d Mark II I set ISO to 1600, shot a few frames and was simply blown away by the cleanliness and usability of the frames, they were fantastic! I pushed the ISO up to 4000 and found I could still get perfectly usable results requiring very little post processing! This will revolutionise my wedding photography and the ability to capture those all important candids in low light situations. Simply amazing!

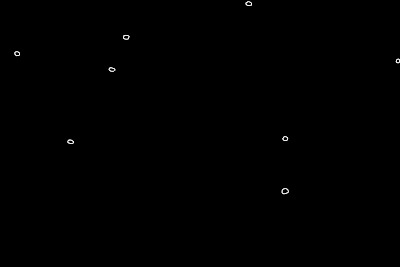
Now one check I always perform on a new camera body is the hot pixel check. The HP check is pretty simple, all you do is place the lens cap on your lens in order to exclude all light, set the ISO at a suitable mid point (I chose ISO 800) and take a longish exposure (30 secs). Now look at the captured image at 100% and it should appear uniformly black, at least on the 5D Mark II. On other cameras that don't enjoy the same high ISO performance as the 5D MK II some noise may be visible, this will take the form of faint mutli-coloured mottling but it should be pretty uniform across the frame, this is normal and not an indication of an issue. In my case, I was checking for "hot" pixels. These often result from small manufacturing errors in the production of the camera's sensors but can also indicate other more worrying issues. To my horror, when I examined my hot Pixel frame, I found somewhere between 8 and 15 instances where the pixel was glowing either white, red of blue. These pixels remain "hot" from frame to frame and could be visible on dark areas of an image, especially when attempting astro-photography. They can also be a problem on dark video scenes where the removal would represent a great deal of work. In the image below I have circled some of the most obvious pixels as they won't show up on the compressed image allowed by Blogger.


The Eight examples circled here were the eight brightest, you can see they are distributed uniformly across the frame.

So why should you worry? After all, 8 pixels in 21 million is a very low percentage, what's the problem? Well consider the following...
  • this is a £2000 camera body!
  • On normal daytime shots, these blemishes would be unlikely to show up. On night shots, Astro photography or video footage of dark scenes, they certainly would.
  • It's a real pain having to remove blemishes from every frame you ever shoot!
  • Blemishes of this type suggest a problem in the quality assurance stage from this manufacturing batch, there could be other hidden problems.
  • Errors in the production of the sensor could be a one-time problem but they could also indicate a sensor with degenerative problems leading to further, significant degradation.
  • When I contacted Canon to discuss the issue, they felt it was a problem and a replacement would be required
I should be receiving a replacement unit very soon. I believe I was just unlucky this time and can't wait to get my hands on this fantastic camera again soon. Once I have my working body I will publish my thoughts and impressions together with some examples of the miracles this camera is capable of.

Thursday 11 June 2009

The mysteries of exposure

I was asked recently to explain exposure, not in the Antarctic sense you'll understand but photographic exposure. This post will try to take this question on and represent another chapter in the set of photographic how-tos and tutorials I've stumbled happily into writing. This is a big subject and this is a longer post than I intended so please bare with me...

Although many would-be photographers use simple point and shoot compact cameras, more and more now buy one of the many affordable digital SLR cameras on the market. Unfortunately many SLR owners, having gone to the additional expense of buying one, leave it in auto mode and end up with essentially the same shots they could have captur
ed with a simpler system. An understanding of exposure and its control opens up a world of many possibilities and creative opportunities otherwise denied by auto mode. you can find an explanation of the limitations of a camera's auto mode in this earlier post.

So exposure, what does it really mean? As with most things in photography, this question has both a technical and an artistic response, for the rest of this post I'll focus on the control of exposure and come back to its artistic use in another post. The simplest definition of exposure is the process of controling the amount of light that is captured by by a camera's digital sensor or film frame. It's the variations in light and dark (highlights and shadows) that form an image and both digital sensor and film have the capability to capture a certain number of di
fferent degrees of light and dark (tones). The range of distinguishable tones that can be captured between the darkest shadows (black) and the lightest highlights (white) is called the dynamic range. All digital camera sensors have a defined dynamic range as does photographic film. The greater the dynamic range, the larger the number of light and dark tones that can be captured and, therefore, the more detail that can be represented.

So that was all very interesting but how does it relate to exposure? For the rest of this discussion I'm going to discuss digital cameras but the principles extend to all photographic equipment including video. The dynamic range of a digital camera's sensor defines the range of tones that can be captured between the darkest shadows and
the brightest highlights. If the amount of light captured in part of a scene is brighter or darker than the limits of the sensors dynamic range, that part of the scene will appear as a featureless area of white or black. In this case we say there's no detail in the highlights or shadows respectively and this is often referred to as "clipping".

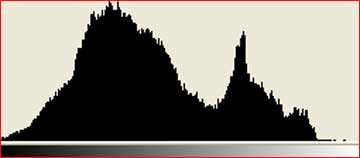
When we control exposure we are controling where important tones in the image sit within the dynamic range of the camera's sensor. Your camera's histogram, the graph-like image that can be enabled on most cameras, is the best way to visualise the exposure of any image (apart from the image itself).


It gives a view of the pixels in the image plotted against brightness levels. The more pixels to the right of the image, the brighter the overall scene and vice versa when the greater concentration is to the left. For a more detailed explanation of the histogram, take a look at
this link. Now there's no such thing as the "perfect" histogram. The distribution of the pixels between tones depends entirely on the nature of the image. Imagine a wide angle photograph of a bride against the dark night sky. Since it's wide angle, the bride would occupy a small percentage of the image. Assuming she's wearing a white dress, and we want to see it against the inky black night sky, the histogram of the shot would show a small group of pixcels to the right (the bride's dress) and a large group of pixels to the left (the night sky) with nothing in the middle. This would be a perfectly acceptable histogram for that scene. The point here is the histogram can be used to quickly and accurately assess if the exposure used actually captured the scene the photographer wanted.

Exposure control means ensuring the things that are highlights, mid tones and shadows are where we would expect them to be in the histogram for any particular image. So what's involved in it's control? Discounting flash for a moment, there are three key elements to exposure control, the photographers's holy trinity if you like - Aperture, Shutter speed and ISO value.

Aperture
The aperture of a lens describes how "open" it is and, therefore, how much light can enter the camera while the shutter is open. Aperture is often expressed as a "f" number e.g f2.8, f4, f5.6 and so on. These curious numbers describe the ratio of the lens' focal length to the width of the opening controlled by the lens diaphragm. In other words a 100mm l
ens set to f4 will have an aperture opening 25mm wide (100 / 25 = 4). The lower the f number the wider the aperture. It's for this reason that very fast (f4 and above) long lenses used by sports photographers are so large, heavy and expensive. Consider a 600mm lens at f4, it would have to have an opening of at least 15cm (6inches) and this would be the minimum width of the main glass element! Photographers ususally vary the aperture value in order to control the Depth Of Field (DOF) of the image, DOF is explained in detail here...

Shutter Speed
No surprises here, whilst aperture defines the width of the open
ing, shutter speed determines how long the sensor is exposed to the light entering the lens. The longer the shutter is open the more light can enter. Photographers vary the shutter speed for a range of reasons. very often, in hand held candid shots for example, we try to select the fastest shutter speed we can in order to minimise camera shake. On some occasions, we want a slower shutter speed so the feeling of motion and movement can be introduced. We do this by the deliberate blurring of moving subjects against a sharp stationary background. or by panning with a moving object keeping it sharp whilst blurring the background scene. In these cases a slower shutter speed is required.

ISO

The ISO value determines the sensitivity of the camera's sensor to light. The higher the ISO value, the more sensitive the sensor is to the light falling upon it and the more detail can be captured for a given aperture setting or shutter speed. The ISO value is typically modified in order to preserve a given combination of shutter speed and aperture in lower light situations. Imagine you're taking a wedding shot in a church with subdued lighting. Even with the aperture wide open at say f2.8. you may be left with a shutter speed of 1/15th sec which would risk the introduction of camera shake. Assuming the current ISO value was 100, setting it to 800 would realise a shutterspeed of 1/125th sec as the sensor will be 8 times (3 stops) more sensitive. There is however an important note of caution, increasing the ISO value will increase the amount of "noise" captured in the image. When the ISO value is increased, the sensor, which converts light falling upon it into electrical signals, amplifies those signals. As with all cases of amplification, random noise is amplified with the signal and can become significant (more on this in another post).

Aperture, Shutter speed and ISO are very closely linked. For any given exposure setting, say f5.6 at 1/250th sec at ISO 100, if I vary one of the values up, and another down by the same amount I will maintain the same exposure! Now at this point I need to explain how the width of the opening of a lens and the time it is open or the sensitivity of the sensor can be v
aried by the "same amount" when they are entirely different parameters. I need to introduce the notion of the "f stop".

Every time I double the amount of light I allow into my camera, I add 1 "stop" to the exposure. Now I can double the amount of light by controling the three value
s we have just described. If I open the shutter for 1/125th sec instead of 1/250th it is open twice as long so twice as much light enters the camera. I've therefore changed the shutter speed by 1 stop. If I open the aperture wider to f4 (f4 admits twice as much light as f5.6 and an explanation of why can be found here) I have doubled the amount of light that can be collected by the camera for any given shutter speed, I have opened the Aperture by 1 stop. If I double the sensitivity of my sensor say from ISO 100 to 200 I have increased the sensitivity to light by 1 stop. This is pretty cool, I have a single unit of measure that can describe three completely different values. the reality is deceptive, although the parameters are very different, they are all affecting the amount of light captured in an image and it is this value that we are actually varying and measuring. See here for a more complete explanation...

When setting up a shot it is the combination of Aperture, Shutter Speed and ISO values that determine the overall exposure of the image. So how do I decide which settings to use? Firstly, if your camera supports manual override (M) it probably also supports Aperture priority (AV) and Shutter Speed priority (TV). If you set your camera to (M) you probably have a view of your camera's lightmeter in the viewfinder. It's typically the case that the meter represents a good exposure by indicating a point in the middle of a scale. If the meter is pointing to the right of centre, it's suggesting over exposure and if it's to the left, under exposure.

Consider the image of the dragon fly landing on a small, weathered wooden fence. There were a number of considerations driving the choice of settings in this image. firstly, being an unpredictable insect I had to choose a fast shutter speed to stand any chance of capturing a sharp image. Secondly, as I was using a long focal length lens, it has a maximum aperture of f5.6 at full zoom . I therefore had to increase the ISO valuer to 400 in order to get the fast shutter speed I needed for the aperture I was forced to use.


The combination of settings in this image delivers histogram that acurately positions the highlites to the right and the shadows to the left without an clipping (pixels bunched up at the edges) leading to lost detail.

Had I chosen a shutter speed 1 stop slower than the settings above, the image would have been over exposed by 1 stop as in the image below (note the histogram is bunched up to the right hand side with much of the detail beyond the limit of the sensor (clipped) these are the very bright areas of the fence that have no or little detail in them)


If i'd chosen a shutter speed that was too fast, say 1 stop faster, I would have ended up with the under exposed image below. (note how the pixel distribution has shifeted to the left of the histogram indicating darker tones make up the bulk of the image. We are aslo beginning to lose detail in the legs and the body of the Dragon Fly)


This image and the choice of settings demonstrate the linkage between the three exposure parameters. In this case, to get the shutter speed I wanted at the maximum aperture I had available to me I actually modified the ISO value!

This was a long post and I have only scratched the surface of this subject. there will be more to come in future posts. In the meantime, try activating the histogram on your camera and watch the effect of different combinations of settings on the histogram and, more importantly, your images.

Wednesday 3 June 2009

Composition, the photographer's secret weapon

Photography is an interesting discipline in that it combines art and technology closely and inextricably. Now I'm a technology guy and in no way would ever be considered an artist of any sort. I'm always looking for tips and tricks to make up for my fundamental lack of artistic talent and I want to share one such technique in this post.

Composition is a crucial component of any shot. Beyond the technical considerations of good exposure etc, it is its composition that determines whether it's a run of the mill snap or a pleasing photographic image. Let's use this image of a tiny Damsel fly taken at some distance in order not to scare it away...


Technically, this shot isn't too bad. The exposure is good, the colour and contrast is strong and there is decent depth of field control. The trouble is this shot is pretty much instantly forgettable, it's subject, the Damsel fly, is small, smack bang in the centre of the frame and lacks impact. You've probably heard that placing the subject of any short in the centre of the frame generally leads to a boring snap. Wouldn't it be great of there was a rule or a formula that could help make that artistic difference? Well there is!

There are a number of tools at the photographers disposal when it comes to improving an image's composition. One most will have heard of is the "rule of thirds", simply stated, the rule of thirds places an imaginary grid over an image where the grid lines divide the scene horizontally and vertically into 9 sections as below.


It just so happens that if the subject of an image is placed on the point these lines cross, a more pleasing composition can be achieved. The rule of thirds is actually an approximation for a better tool based on the amazing "golden ratio", This video gives a great explanation of the ratio and its fascinating properties as does
this post.


Now let's apply the golden ratio to this image instead of the rule of thirds, the grid would look something like this.


Now using this grid we can crop the image so the Damsel fly occupies more of the frame. In addition we position the key part of the subject on the intersection of the grid lines...


The result is a dramatic improvement in the feel and aesthetics of the shot. The eye is drawn naturally to the head of the insect, the image below seems somehow more natural, more alive, an intimate view of a living secret world.


The Golden ratio grid also works in portrait view as below...


Cropping in this way brings the same sense of life to the image but changes the feeling of scale...


In these examples I've applied this technique by cropping the image in post processing using Adobe Lightroom. Generally I try and get as close to this type of composition as possible when taking the image in the first place. I do this by trying to imagine where the intersection of the grid lines would be in my viewfinder and positioning the subject accordingly at the point I take the shot. Only small adjustments are then required in post processing preserving as much of the original as possible.

The Golden ratio is a powerful tool, try thinking about it next time you look through your viewfinder. If you find the Golden ratio tricky, try the rule of thirds, it's a good approximation, easier to imagine and usually produces good results. If you have a compact camera and use the screen at the back to compose your images, you could even place small marks on the screen marking the intersection points. If you use these techniques you will see a tremendous improvement in the quality of your shots and everyone will want to know how you do it...

Friday 29 May 2009

The perfect replacement for Windows?

A few posts back I was trumpeting the arrival of Linux Mint 7 code named "Gloria". I said at the time I felt it was a very good desktop/notebook distro and a real contender for a Windows replacement. I did intend to write a post, for Linux newbies, dedicated to the installation and configuration of Mint such that a complete and fully operational system could be constructed. The good news for me is someone has already done just that so here it is...Linux Mint - constructing the perfect desktop

Thursday 28 May 2009

Summer hits London

You know when Summer's here, sunshine, warm sulty breezes and butterflies. I looked out of my window this morning and was greeted by hundreds of Painted Lady butterflies (Vanessa cardui) congregating on some flowering shubs. I grabbed my Canon 40D and my 100-400 mm f4.5-5.6L IS lens and went out to capture some shots in between conference calls!


I chose the 40D rather than the 5D as it as an APS-C sensor which applies a 1.6x crop factor. These butterflies are very skitish and the effective focal length of 640mm at full zoom enabled me to get in nice and tight without causing them to flee.


By the way, I wanted to use the right collective noun for butterflies and found there were a few choices. Flight, flutter and rabble were good, but my favourite was kaleidoscope !


Tuesday 26 May 2009

Linux marches on

Earlier this month, Linux operating systems represented more than 1% of the global desktop computer installed base compared to the better known alternatives like Windows and Apple's OSX. While this number may not seem impressive on the face of it, the month to month growth of 0.12% is well above the average rate of 0.02%. Windows XP showed a 0.64% decline and, while Vista grew, its growth rate slowed to 0.48% from an average of 0.78%. I was surprised to note that OS X usage rates had declined to 9.73% from 9.77%. So what to make of these figures?

It's no surprise to see a decline in XP use albeit a relatively modest reduction. Most new Windows machines sold are Vista based and these sales will dilute the XP insalled base in favour of Vista. Netbook sales will, however account for some of XP's persistance. Vista just doesn't cut it on the Intel Atom based platforms with their modest 1G RAM allocation and low key graphics capability. The fact that XP's decline is modest and Vista's growth "dissapointing" (if you're a Redmond based product manager) really stems from the unwillingness of the large enterprise market to fully adopt Microsoft's resource hungry product. Better for them they stick with the Devil they know and (possibly) await Windows 7 or something else. Why? well there will be a number of considerations that lead to this conclusion, not least the cost of hardware upgrades that would likely accompany a Vista roll-out (more RAM at least) or it may be XP still provides most of the value and capability needed for office applications. XP has been in the market for a long time now so the much vaunted security "improvements" offered by Vista have already been addressed or worked around by Enterprise IT organsiastions used to XPs capabilities and architecture. No one should ever under estimate the cost to a company of moving to a new IT platform. Licenses, hardware, training and IT support effort are just a few of the costs that will peak with any new roll-out, perhaps these uncertain economic times do not suggest a good time to jump to something new. It's likely that Apple's numbers have declined in line with economic pressure. While A Mac Book or iMac are still highly desirable aspirational items, that desire may not not turn into wallet emptying behaviour while the spectre of unemployment hangs over the target market.

What of Linux? I'm not surprised to see growth in the Linux usage numbers. The Linux Distributions themselves seem to have placed a great deal of focus on mainstream desktop applications; Ubuntu's 9.04, Linux Mint 7 and the soon to arrive Fedora 11 have all placed a great deal of empasis on the needs of the desktop user. All the distributions have targetted boot time, graphics improvements, font management etc. etc. I referenced Netbook sales as a contributor to the stickiness of XP and the dilution of Vista's performance. Well let's not overlook the relevance of Linux on these little platforms. Dell package some of their Netbooks with Ubuntu 8.04 and the nature of the OS lends itself to this resource constrained environment. Even the Red Hat based Fedora, a weapons grade, server focussed Linux distro has added many desktop friendly features to it's forthcoming release. Fedora have added a specific feature relating to enhanced power management for Netbook applications, since when did server operating systems concern themselves with battery life?

The next few months will be very interesting. Microsoft are betting the farm on Windows 7 and Apple look to be planning an assault on the Netbook market with their very sexy tablet PC. Through all this it is likely Linux will continue to emerge as a viable alternative, If the growing trickle of Enterprise deployments turn into a flood, Linux will truly arrive on the desktop scene.

Sunday 24 May 2009

A quick snap

I awoke this morning and casually looked out of my kitchen window (I live in a first floor apartment, that's the second floor if you're reading this in North America!) and noticed this little fox cub playing in the gentle warmth of the early morning sun.


It was one of those "bugger! where's the camera?" moments. I managed to grab my Canon 5D and attach one of my favourite lenses, the superb 100-400mm f4.5-5.6 IS L and fire off a few frames before the cub disappeared back into the undergrowth. I had to take the shot through a window pane as the noise
from opening the frame would have scared the little guy away. Unlike most L series zooms it doesn't have constant aperture through the zoom range but, nonetheless it does possess the magic that is Canon L series optics. Now this isn't the finest shot ever taken by a long way but the reasons I like it are as follows :-
  • It was taken through window glass (at an angle)
  • It was taken from a distance of about 30 meters (100 feet)
  • The image above results from a very aggressive crop of the original frame.
Taking the points above into account, it shows just how important good optics are for any shot. I really did crop this very hard (it's less than 20% off the original frame) yet it still retains considerable detail and contrast even though it was taken through a rather grubby pane of glass at a good distance. This really highlights the incredible resolving power of these lenses and ensures the full potential of modern digital sensors can be exploited. These lenses are pricey and the link I've used above takes you to the canon site where the full recommended retail price is quoted; there are, however, numerous sites that offer this lens at a more affordable level. If you're really lucky you may even find a used one but it's unlikely, photogs would give up a limb before giving up an L series lens!

Thursday 21 May 2009

Depth of Field Update

Following on from my recent post describing photographic Depth Of Field I wanted to post a link to David Ziser's Blogg where he discusses the composition of family portraits and the use of DOF in the construction of those shots. David's blog is one of my personal favourites as he shares many pro tips and techniques including some great video tutorials.  Check it out...

Monday 18 May 2009

What is Depth of Field?

Composition is probably the most important component of a pleasing image. It is composition that sets a piece of photographic art apart from a simple snap. Interestingly enough, composition is defined as much by that which isn't obvious in a shot as those elements that are clearly defined. Depth of field is the term that describes which elements of an image are visible in acceptably sharp focus and which elements are blurred out. Depth of field defines that area of an image that extends in front of and behind the focal point of a particular subject. Typically landscape photography requires very large depth of field, everything from a few inches in front of the camera to infinity has to be in acceptable focus. Look at any examples of the best and there is always something in the foreground, something close, often refered to as foreground interest. Being a landscape shot not only should there be foreground interest but there should be clear focus all the way to the horizon. Candid shots of people and some portrait techniques often call for much narrower depth of field, in some cases only a couple of inches front to back are in sharp focus. I have examples of great candid shots where the subject's eyes are in focus but the tip of their nose and their ears aren't!

Depth of field is a crucially important tool in photographic composition and its skilled control really can add to one's photographic repertoire. It allows the photographer to clearly define the central subject of any image, isolating it from confusing and distracting backgrounds. Consider this first shot; it's quite a nice summery scene and the subject, the brick built bird tower, is visible and obvious. Even though it is the most dominant structure in the picture it blends into the overall scene and doesn't "pop" from the surroundings
(by intention in this case).

(Click image to enlarge)

Now consider this second image. Just a single glance reveals the subject clearly, even though it's nothing more than a small group of tiny pink flowers. The reason these tiny little blooms "pop" so evidently is the eye's urge to examine items in sharp focus and ignore less defined components of the scene.

(Click image to enlarge)

The process of using focus in this way relies on appropriate management of Depth Of Field (DOF). Until recently, useful DOF control was only really available on higher end SLR cameras. SLRs, specifically their lenses, enjoy large apertures and long focal lengths and it is the combination of these parameters that provide the narrow DOF effect. This is much more of a challenge on smaller compact cameras due to the physical size limitations enforced by the compact format. More recent compacts do offer the attributes necessary to achieve these desirable results and the Canon Powershot G10 is a good example. The combination of a very short focal length and small maximum aperture explains why most compact cameras defer to providing extensive depth of field ensuring as much of an image is in focus as possible.

OK so far so good, DOF is a great thing, so how do you control it? It's actually pretty simple if your camera has the capabilities. DOF varies depending on the focal length of a lens, its aperture setting and the distance between the camera and the desired subject. if you want to close down the depth of field so only a narrow sliver of the image is in sharp focus, use a lens of 50m focal length or greater and open the aperture as far as you can (f5.6 or wider) while getting relatively close to your subject. If you want to open up the DOF ensuring as much of the field of view is in focus as possible, close down the aperture to say f11 or smaller. If you have the capability, set your camera to AV (aperture value) mode where the camera will adjust the shutter speed automatically. This way all you have to think about is the composition and the desired DOF by varying the aperture. (most pros shoot with manually set values. If they are going to use an automatic mode, it will typically be AV as it gives them creative freedom to adjust DOF). There is a complex equation that enables the calculation of DOF but it is more complicated to explain than the scope of this post permits. Fortunately there are a number of on-line calculators that can help and DOF Master is one of the best. The link offers access to the on-line calculator and its downloadable forms. This site also provides a nicely illustrated description of Depth of field and the various components and considerations that enable its mastery.


Thursday 14 May 2009

Ubuntu's all fresh and minty

In an earlier post I argued the case for Ubuntu 9.04 being a serious contender as a mainstream desktop operating system. I suggested it was stable, fast and more than capable of taking on the likes of XP, Vista and even the new Windows 7. If you take into account the fact that it is free then it really does challenge all the commercial OSs including Apples beautifully designed OS X. No sooner had I completed the post and a new pretender appeared, well sort of. Linux Mint 7, code named "Gloria" is available for download as a Release Candidate. there are many reasons why I like this distribution based on the initial testing I have undertaken.


First and foremost, "Gloria" is built upon Ubuntu 9.04 so everything I said in my earlier post still holds.

Secondly, Gloria has been very thoughtfully constructed. Care has been taken to ensure everything a desktop user needs to get started is included. there really is very little need to venture into the Linux terminal for the inexperienced user. Any Ubuntu user will know Adobe Flash has to be installed if you want to watch any web video - the Gloria distribution includes Flash pre-installed and ready to go. Linux users know it contains an incredibly powerful firewall capability in iptables (not just a firewall either, iptables can satisfy many networking tasks) For inexperienced users, iptables can be very daunting and confusing as it is command line driven. Gloria provides a very simple yet effective firewall configuration UI. In addition to this and all the normal applications like Open Office, you will find Mint Backup, an application that enables simple backup of your home directory, Mint Nanny which provides some internet security and domain blocking. Compiz-Config manager is installed by default providing some really powerful desktop user interface and experience configuration. All in all it's pretty complete and very impressive.

Finally, I have to say, and this wouldn't normally be a consideration, Linux Mint 7 just looks great! The theme is very well thought through and particularly elegant. From the desktop backgrounds to the window frames and the styling and operation of the single taskbar/panel, Mint 7 wins. Dowload the ISO from this link and give it a try, you'll be glad you did ...

Tuesday 12 May 2009

Drag that shutter...

Time for another photography post. This one is related to the first ( Using your flash on a sunny day ) where I attempted to show the power of using your camera's exposure settings and flash unit essentially independently.


In this post I'm going to talk about "dragging" the shutter. This technique is usually used in low ambient light situations, night time scenes, sunset shots, shots taken at parties and in night clubs. Dragging the shutter means setting a shutter speed that is long enough to capture light from the background while relying on the short flash burst to capture the foreground. In the first post, we were trying to reduce the amount of ambient light collected by the camera by increasing the shutter speed and using the fast flash pulse to illuminate the subject. We were doing this in order to reduce the impact of the blindingly bright background light, the Sun. This time we are going to reduce the shutter speed to allow as much ambient light in as possible.

So why worry about this at all? Everyone will have seen shots, usually taken at a party or a wedding, where the subjects are brightly illuminated by flash but are captured against a completely dark background. There is no context to the shot, it could have been take anywhere, to all intents and purposes it might as well have been taken in a cave! This happens because the subject is typically close, the background is relatively distant and the flash pulse isn't very powerful. The camera's flash exposure calculation takes over in this situation. The aperture and shutter speed are set by the camera to a standard value (the flash's x-sync speed) and the flash fires in order to expose the close foreground subject. The first image is an example of such a shot (this was deliberately exposed in this way to achieve the desired shot but it does illustrate the point...)

What if we wanted to capture more of the background? What if we wanted to use the background to s
et the scene, convey something about the occasion or the location? In situations where the light levels are low, we need to take control from the camera as we did in the bright daylight examples in Using your flash on a sunny day. In this case we want to reduce the shutter speed in order to allow much more of that precious available light to enter the camera. As in the other post, we set the flash to expose the subject. This can be achieved by leaving the flash to automatically set it's power setting for a proper foreground exposure (auto mode) or, if you know your flash distances, the flash power can be set manually.

But hang on, doesn't that present a problem? Surely reducing the shutter speed, possibly by a great deal in the case of a dark room, will lead to blurred shaky images? Once again the flash comes to the rescue. The flash pulse is very fast indeed, certainly less than 1/2000 sec. It will freeze in space and time anything it illuminates. Even thoug
h the background may be subject to a little shake, it will typically be blurred out by the depth of field of the image (subject of a future post). The foreground subject will be sharp, well illuminated by the short flash burst but set in context.

It's not uncommon to use hand held shutter speeds as low as 1/15 sec with this approach, even lower where where your camera has built in image stabilisation. The second picture, taken within twenty minutes of the first, demonstrates why "dragging" the shutter can make a massive difference to the feel and look of any low light shot when flash is used.

Friday 8 May 2009

Why you should consider vitualisation at home

Fashions and fads seem to dog the world of technology and computing in particular. One of the key trends that has continued to gain popularity is virtualisation. To date, virtualisation has been the domain of the big corporate IT organisations or the geeks and tech-heads amongst us; more and more it's becoming available and meaningful to the home desktop user.

"So what is virtualisation and why should I care?" I here you cry. Virtualisation (at least in the context of this discussion) refers to the technology that allows us to divide a single hardware platform (a PC or a server called the host) into a number of separate virtual machines (or guests) running their own operating systems or multiple instances of the same operating system. Each virtual machine looks, feels and smells like a complete system equipped with it's own devices, disk space , RAM etc. Each machine is isolated from the others and operates as independently as any stand alone box.

OK, so this is all very cool, if slightly geeky, what's the point? Let's start at the high end and work down to the desktop. If you look at most large datacentres they contain vast stocks of servers performing an array of compute tasks ranging from large database management, massive parallel number crunching, desktop hosting, anything and everything. If you consider the finance industry, retail banks, investment banks, insurance companies and the like, their entire operation is essentially contained in and defined by their datacentres. Now these data centres are vast, and I mean really vast. They normally draw so much power they need to be built near national grid substations. It's the size, power and cooling requirements of these facilities that has driven interest in virtualisation. Consider an average corporate data centre (there are thousands of these globally) each datacentre contains hundreds, often thousands of individual servers. Each server has to be purchased, it occupies space, draws power, requires cooling, cabling software installation and the list goes on. Each individual box attracts a long laundy list of costs. When you consider just how many servers a data centre might contain, you are talking about a great deal of cost.

In any datacentre containing so much equipment and drawing so much power, you have to hope it is efficiently utilised and doing something useful all the time. Unfortunatley this is not the case. Take CPU utilisation as a good inidicator of the extent to which a machine is gainfully employed, it's not uncommon to find average CPU utilisation levels at 10% or less! This means all that expensive kit drawing all that valuable power and requiring all that power intensive cooling is bone idle 90% of the time!!! What if some of that idle time could be usefully employed? This is where virtualisation comes in. It allows us to make a single server look like many servers all complete, all able to perform completely independent tasks yet only consume the power, space and cooling of a single machine. Virtualisation ratios (the number of virtual machines contained within a single host) are growing all the time. Right now 25:1 is not uncommon (25 VMs on a single host) In this case the average CPU utilisation is now approaching 60%, a much better figure. With these kinds of VM ratios, a data centre can deal with capacity growth without increasing it's real estate, hardware, power or cooling requirements, this is a God send!


Virtualisation provides a hosts of benefits beyond the obvious cost efficiencies. Physical servers take time and effort to install. They have to be purchased, delivery from the server supplier takes time. Someone has to physically transport the box to its position in the datacentre, power it, cable it to networking gear, install it's operating system, configure it's applications and the manage it during the remainder of it's life. In a Virtualised data centre, life is much simpler. Virtual machines can be created very easily, in fact just a few mouse clicks are all that's required to create a brand new virtual PC or server. VMs can be created from pre configured templates, in large data centres this makes the process of responding to demands for more processing capacity very simple indeed. Forget all that horseing around with boxes and cables, forget the hours of installation. With just a few mouse clicks and in just a few seconds a request for capacity is turned into a fully functioning, fully equipped virtual machine ready for work. So this sounds like a major bonus for industrial scale datacentres, how can it help at home? Well the list of applications is long and growing.


Trying out new operating systems
New operating system releases abound. Each week there seems to be a new version of this or that. If you are a Windows user and considering a move to something else, perhaps Linux or even Windows 7, wouldn't it be great if you could try it first without having to totally disrupt your existing system? Well you can, nearly all OSs can run perfectly happily in Virtual machines. The one exception is OS X from Apple. The issue is not technical, it's perfectly possible to get OS X running in a VM, the issue is commercial and legal. OS X is only licensed to run on designated Apple Hardware or, within a VM running on an OS X host and on Apple hardware. One day Apple will wake up and realise their value is in their software and not their hardware. In most cases, their hardware is overpriced and made from commonly available components secreted in a shiny box, but that's the subject of a future post.

Testing new software
Virtual machines are completely isolated from other virtual machines and the host system they reside upon. You can do the most gruesome things to a virtual machine and it will have no impact upon anything else. You can take a snapshot of a virtual machine at any point in time, a bit like freezing the machine's current state so you can return to it later if the need arises. It's a great way to test the new software you may have downloaded or acquired from a friend before you commit to deploying it on your valuable system. If the new software causes your system to crash and burn for any reason, no problem, just return to the snapshot and start again. If that software introduces something nasty under the hood, no problem. only the VM will be affected, the host system is completely protected. Just delete the VM and return the USB key to your friend with a knowing shake of the head!

Secure purchases and on line banking
We all know about the perils of malware, trojans, trackers, worms etc. These are the thing of nightmares, surreptitiously moving into your home system without an invite. Once there they silently and quietly lie in wait for the poor unsuspecting user to visit e-bay or pay pal or any other site where a username and password would be a valuable steal. Now we all know keeping virus protection software up to date, running regular adware and spyware scans represents the path to health and computing fitness. We also know that the means of infection are evolving faster than the means of detection so, what to do? Why not establish a virtual machine dedicated to banking and administering important financial sites. Only ever use this machine for accessing your bank account or pay pal. If you want to surf, download music, movies or software, use your test virtual machine. You can keep these two computing activities totally separate and secure.

Supporting inexperienced PC users
Maybe you have a single desktop PC and a number of family users. They may not be quite as careful with your precious system as you would wish them to be. The kids will download all sorts of nefarious stuff whilst your partner may have that magical quality that causes systems to roll over as soon as they come into contact with the keyboard. Why not give everyone their own virtual machine? It doesn't matter what they do or how hard they try, if they screw it up, you can get them back up and running in no time with no threat to anyone else. alternatively, Like me, you may support friends and family's PC systems, you will have been called upon at all times of the day and night to correct a system that, for all the world, has had its file system savaged by a rabid dog. For those users for whom this is a regular occurrence, why not give them a virtual machine to use instead of the host system. What ever they conspire to do, you will always be able to gain access to the host and return them to a working state in no time flat.

Migrating to Linux but maintaining access to a one or two windows applications
Whilst more and more people are moving to alternate operating systems, there are certain applications that remain stubbornly bound to the Windows or OS X operating system. In this case, why not migrate to to that new shiny OS but maintain your access to those key applications by creating a dedicated Windows VM for them. This doesn't just apply to products like Photoshop, Premier Pro and the like, more and more virtualisation solutions enable playing of graphically intensive games requiring sophisticated graphics and 3D acceleration. The latest versions of KVM under Linux support the allocation of entire PCI devices to a VM so it is possible to dedicate a graphics card or any other hardware for that matter.


More and more virtualisation is becoming a mainstream tool for use by the home user, it has a host of uses and benefits and I would encourage anyone to take a look and give it a try. there are many different solutions out there, VMWare has been the most prominent but the freely available open source variants are just as useful and easy to use for the home user. My personal favourite at the moment is Virtualbox. Virtualbox is available for all the major host operating systems, it allows Windows, Linux and even OS X users to create and manage those incredibly useful virtual machines in a very simple, reliable package. Give it a try, you'll be pleased you did.

In a future post I'll cover off creating and using VMs so stay tuned...


Tuesday 5 May 2009

Linux is ready for your desktop

So why should you look at a new fangled and strangely named operating system? What difference does it make? What is all the fuss about? Operating systems should be seen and not heard, or is that used and not seen? well you know what I mean.

As time has past the role of the operating system (OS) has evolved significantly. It was the case that operating systems were personality free. They provided a silent, hidden service working their magic way below the surface of the user's consciousness. The only interaction one had with this hidden intelligence was simple command entry at a flashing green cursor. It was the applications that attracted focus and attention and quite rightly too. There was a key division between the OS which provided "life support" and the applications that provided the value and output for any given task. Today the lines of demarcation have blurred. OSs like XP, Vista, OS X and the various Linux distributions embody applications in addition to the base OS capability. Many of these applications are tightly integrated into the OS itself. As a consequence, the Operating System beauty contest has become the primary competition. The emergence of a new OS release generates the same kind of celebrity fervour as your average summer blockbuster release. I'm sure our political leaders crave the column inches and attention bestowed upon the release of the next Microsoft or Apple release.

All of this to say operating systems
are important, they now define the way we work, play and communicate. They begin to have such a central part in our daily lives that thoughtful consideration should be applied.

So let's get into it. Why Linux? why Ubuntu ( http://www.ubuntu.com/ ) in particular? We all know, or should know, that Linux is Free to download and use, but that alone is not a sufficient justification. In order to attempt a meaningful answer to these questions I will deliberately avoid the dark nooks and crannies of technical intricacy. Instead I want to make the argument from the perspective of the everyday user. If my argument holds and Ubuntu really can be a mainstream alternative, it has to offer value to everyone irrespective of background or knowledge. Linux must embrace a broader church than the bearded-geeky-sandal-wearing-tech-freaks.

It provides all you need (well almost)
When you install Windows for the first time, it will spring into life (eventually) and then...That's exactly it, then what? If you have a pre packaged machine you will have some applications but generally they will be the stunted short forms of their elder siblings. Microsoft Works for example. Why is it so many machines running Microsoft Works also have Microsoft Office installed? Unless the Office installation was acquired by nefarious means, that application suite alone represents a significant investment. Ubuntu's productivity applications come by way of the wonderful Open Office project sponsored by Sun Microsystems (now Oracle)

All of Ubuntu's Open Office applications are fully functional grown ups capable of real work. Let's look at the Evolution email client for example. It is a very good analogue of Microsoft's Outlook. PST files (The files that store all of your Outlook data) are easily imported. Evolution now supports the protocol that Microsoft use to connect Outlook to an Exchange e-mail server so it even has potential for large corporate users. Take a look at the office applications, Spreadsheet looks, works and manipulates files like MS Excel, Presentation the same for Powerpoint and the Word processor is a dead ringer for MS Word. All import and save MS file types even supporting the new .docx format produced by Office 2007. Pidgin provides a very good, light weight multi network IM client and Brasero (I know, it's a weird name) provides Optical disk burning capability sufficient to make Nero blush.

In addition to the standard issue tools, a plethora of utilities and applications are available from the Linux repositories. These wonderful structures provide a kind of application super market where one can explore, browse and finally choose the item required. the applications in the repositories are essentially approved, quality stamped and safe to install. they are provided and supported by the community and, as is the case with Linux generally, are free of charge to download, install and use. Even the installation is a cinch, either use the "package manager" under the Administration menu or venture to the command line and type " sudo apt-get install xxxx" where xxxx is the application you are after. simple!

The thing to note, and we'll explore this in more detail later, all this is FREE!
Ubuntu 9.04 provides the following applications
F-Spot Photo manager, Gimp image editor, Open Office drawing, XSane image scanning
Ekiga Softphone, Evolution mail, Firefox, Pidgin, Transmission Bit Torrent client
Dictionary, Evolution Mail and Calendar, Open office presentation, Spreadsheet and Wordprocessor
Brasero Disc Burner, Movie Player, Rythmbox Music Player, Sound Recorder

It's reliable
Linux can be found in many surprising guises. take a look at your humble home router, chances are it's running Linux. The suitability of the technology extends far beyond the playthings of the average man on the street. Instances of the Linux operating system are to be found at the heart of many industrial grade, so called "mission critical" devices and applications. Much of the telecommunications infrastructure that provides the modern Internet is Linux based. Host a web site with your friendly ISP and they may well be offering you server space on a Linux server. many of our largest banking establishments (I know, not popular right now) use Linux extensively and at the heart of their data centres. A bank's data centre is its most important asset, without the reliable storage and management of all that account data and financial information the bank would not be viable. I've gone through this long diatribe in order to demonstrate the inherent reliability of the Linux platform. There are many varieties of Linux but all are built upon THE Linux kernel and embody significant helpings of this natural born robustness. No room here for the "blue screen of death" !!! It's not uncommon for Linux systems to run unattended for months or even years! When was the last time your Windows box rebooted or shut down because of some unexpected update or bug?

It's fast

While one operating system's relative speed to another can be measured, it's the subjective "how-does-it-feel" performance experienced by the desktop user that is equally important. Trust me, compared to the mainstream OSs Linux is very slick. From the time taken to boot to the time taken to shut down Linux is rapid. once up and running (as little as 28 seconds on my system with Ubuntu 9.04) the desktop environment itself feels light weight and agile. Install one of the compositing window managers, try Compiz fusion, and even graphics intensive operations like rotating desktops are smooth and lithe. Just to put some numbers on this, I use a very simple benchmark just to test the performance of a machine's processor. Super PI provides an algorithm that calculates the value of Pi to any desired number of decimal places. The standard benchmark calls for a calculation yielding 1,000,000 decimal places of significance. On my system running Windows XP pro, the calculation takes about 21 seconds. Not bad by any means. Boot into Ubuntu, run exactly the same algorithm and a heart stopping 13.5 seconds later the calculation is complete; that's a difference of 35% !! this is by no means a complete test and there are many other factors that define performance but it does give a useful indication. Linux is a swift operating system.

It's developed and maintained by the community
For me one of Linux's most compelling characteristics is its development model, the community contribute content and fixes to the operating system together with the contents of the repositories. This has a number of implications. Fixes to problems appear swiftly a regularly (Ubuntu's automatic update process is a thing of beauty). These updates are made available as soon as available, downloaded and installed with the minimum of fuss and very seldom require an application to be closed let alone a system reboot!

The community's contribution runs much deeper however. the Linux development team is very large indeed. Although there are designated application and subsystem owners, pretty much anyone can suggest a modification, improvement or completely new application. The community as a whole has the opportunity to inspect source code, discuss alternatives and, ultimately, approve its inclusion. This means new capabilities appear with great frequency. It almost seems to be the case that if you can think of something you need, someone else has already provided it. It really is a very powerful development model and has lead to Linux's comprehensive capabilities, security and system robustness.

it's very secure
Security in this context means many things to many people. In this section I'll be considering this subject from the point of view as the average home based PC desktop user.

Firewalls

It is generally the case, these days, that most home PCs sit behind a router of some description. That router will either be a stand alone routing unit installed to enable the sharing of a broadband connection or it will be integrated into an ISP provided integrated ADSL Modem/router, these routers nearly always include a built in firewall capability. It is less and less the case that a single machine sits on a direct connection to the Internet. It is for this reason that I am particularly pleased that Ubuntu ships without a firewall enabled by default, home networking is so much easier!. Ubuntu, like any Linux distro does deliver an extremely powerful command line based Firewall in IPTables. IPTables can achieve the kind of selective protection and configurablity found in Enterprise grade devices but, for the average punter, it's a bit of a sledge hammer when one only wants to crack small nuts. If your Ubuntu desktop is directly connected to the net, or a simple firewall is required for some other reason, there are a number of Firewall GUI front ends available from the repositories (for free) that make the task simple. Two such examples are Lokkit and Guarddog. lokkit is simple and straightforward, Guarddog is much more configurable and designed for the more advanced user.


Virus protection
Virus protection on Linux systems is effectively redundant. there have been a few mail worms in the past that have been propagated through Linux mail servers. However the generally accepted form of Malware that embeds itself in innocent looking downloads and then runs amok on unsuspecting and unprotected systems is effectively non-existent in the Linux world. there are many reasons for this, not least the fact that most software is acquired from the repositories where it's source code and resultant binaries are scrutinised by the community. There are also architectural reasons that make it less likely to attack. In reality Linux's modest user base is also a major contributor to its apparent immunity. While we shouldn't be complacent, it's unlikely that Linux will ever suffer the same abuse that has blighted Microsoft's progeny.

User administration
Linux offers extremely flexible user, password and access administration. For me, the separation between general user access and Administration user access is particularly well defined. In Windows based systems, you are a privileged user or you are not. Once you have logged in as that user, you are free to do essentially anything without prompting, further warning or protection. Linux has the notion of the Sudoer list. Users on this list are permitted to perform "dangerous" or system administration task if they prefix those operations with the "sudo" prefix and can then provide the admin password when required. this has many advantages, but the combination of smooth work flow (not having to log in separately as admin) and protection (not having the opportunity to forget you are logged in as admin) make for a flexible, highly usable yet secure system. As a further key protecting element, Linux will always prompt for the admin password when requested to install or uninstall system components.

It's establishing itself with the PC vendors
Dell deliver Ubuntu 8.04 on the Dell Mini 9 Netbook PC. This fact shows the level of maturity Linux is achieving as a commodity desktop solution. The fact that it's appeared on low power netbooks first is an interesting development itself when one considers Linux and Unix's background. It just shows how efficient and portable Linux has become.

It's not perfect - Sometimes you have to use Windows / OS X

Ok so far everything has been rosy in the garden. If you've read this far I would be surprised if you haven't already downloaded the Live CD and have your finger hovering over the Enter key. But before you leap into the unknown without your Bill Gates approved safety net, consider the following. There are certain applications and tasks that have yet to be implemented under the Linux banner. If you are a digital photographer or certainly a vidieographer all is not quite so positive. Although GIMP is a powerful digital image manipulation application and it is possible to construct a solid digital photo production workflow, there really is no alternative for Adobe Photoshop or Lightroom for most pro photographers. I have no real experience in the video production arena but I suspect the same is true when considering video production where Final Cut Pro and Adobe Premier are considered the de facto standards. these applications don't have a portation or analogue under Linux right now. Things may change in the not to distant future; it is already possible to "skin" GIMP to look very much like Photoshop and applications like Kino may well mature into a strong video editing contender. In most other areas, linux stands up very well.

And finally...
In most cases throughout this post I've compared Linux with Wndows OSs. Apple's OS X does offer many of the attributes that define Linux and Ubuntu. To many, OS X looks "prettier" and does in many cases have a more sophisticated workflow orientation. All of this however comes at a cost both in terms of software and certainly hardware. Linux is and always will be free to download and free to use. The list of hardware supported by Linux grows at a furious rate, everything from the smallest netbook to the largest server. The community continues to grow, industry acceptance is in place, the range of applications is vast and now, with Ubuntu 9.04, the desktop user at home can install and operate a fully functional, productive, secure and well maintained Operating system at home for free without the need for a beard, sandals or a degree in Computer Science.