Although many would-be photographers use simple point and shoot compact cameras, more and more now buy one of the many affordable digital SLR cameras on the market. Unfortunately many SLR owners, having gone to the additional expense of buying one, leave it in auto mode and end up with essentially the same shots they could have captured with a simpler system. An understanding of exposure and its control opens up a world of many possibilities and creative opportunities otherwise denied by auto mode. you can find an explanation of the limitations of a camera's auto mode in this earlier post.
So exposure, what does it really mean? As with most things in photography, this question has both a technical and an artistic response, for the rest of this post I'll focus on the control of exposure and come back to its artistic use in another post. The simplest definition of exposure is the process of controling the amount of light that is captured by by a camera's digital sensor or film frame. It's the variations in light and dark (highlights and shadows) that form an image and both digital sensor and film have the capability to capture a certain number of different degrees of light and dark (tones). The range of distinguishable tones that can be captured between the darkest shadows (black) and the lightest highlights (white) is called the dynamic range. All digital camera sensors have a defined dynamic range as does photographic film. The greater the dynamic range, the larger the number of light and dark tones that can be captured and, therefore, the more detail that can be represented.
So that was all very interesting but how does it relate to exposure? For the rest of this discussion I'm going to discuss digital cameras but the principles extend to all photographic equipment including video. The dynamic range of a digital camera's sensor defines the range of tones that can be captured between the darkest shadows and the brightest highlights. If the amount of light captured in part of a scene is brighter or darker than the limits of the sensors dynamic range, that part of the scene will appear as a featureless area of white or black. In this case we say there's no detail in the highlights or shadows respectively and this is often referred to as "clipping".
When we control exposure we are controling where important tones in the image sit within the dynamic range of the camera's sensor. Your camera's histogram, the graph-like image that can be enabled on most cameras, is the best way to visualise the exposure of any image (apart from the image itself).


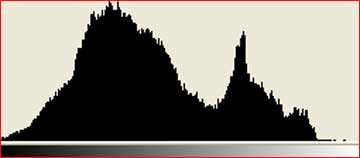
It gives a view of the pixels in the image plotted against brightness levels. The more pixels to the right of the image, the brighter the overall scene and vice versa when the greater concentration is to the left. For a more detailed explanation of the histogram, take a look at this link. Now there's no such thing as the "perfect" histogram. The distribution of the pixels between tones depends entirely on the nature of the image. Imagine a wide angle photograph of a bride against the dark night sky. Since it's wide angle, the bride would occupy a small percentage of the image. Assuming she's wearing a white dress, and we want to see it against the inky black night sky, the histogram of the shot would show a small group of pixcels to the right (the bride's dress) and a large group of pixels to the left (the night sky) with nothing in the middle. This would be a perfectly acceptable histogram for that scene. The point here is the histogram can be used to quickly and accurately assess if the exposure used actually captured the scene the photographer wanted.
Exposure control means ensuring the things that are highlights, mid tones and shadows are where we would expect them to be in the histogram for any particular image. So what's involved in it's control? Discounting flash for a moment, there are three key elements to exposure control, the photographers's holy trinity if you like - Aperture, Shutter speed and ISO value.
Aperture
The aperture of a lens describes how "open" it is and, therefore, how much light can enter the camera while the shutter is open. Aperture is often expressed as a "f" number e.g f2.8, f4, f5.6 and so on. These curious numbers describe the ratio of the lens' focal length to the width of the opening controlled by the lens diaphragm. In other words a 100mm lens set to f4 will have an aperture opening 25mm wide (100 / 25 = 4). The lower the f number the wider the aperture. It's for this reason that very fast (f4 and above) long lenses used by sports photographers are so large, heavy and expensive. Consider a 600mm lens at f4, it would have to have an opening of at least 15cm (6inches) and this would be the minimum width of the main glass element! Photographers ususally vary the aperture value in order to control the Depth Of Field (DOF) of the image, DOF is explained in detail here...
Shutter Speed
No surprises here, whilst aperture defines the width of the opening, shutter speed determines how long the sensor is exposed to the light entering the lens. The longer the shutter is open the more light can enter. Photographers vary the shutter speed for a range of reasons. very often, in hand held candid shots for example, we try to select the fastest shutter speed we can in order to minimise camera shake. On some occasions, we want a slower shutter speed so the feeling of motion and movement can be introduced. We do this by the deliberate blurring of moving subjects against a sharp stationary background. or by panning with a moving object keeping it sharp whilst blurring the background scene. In these cases a slower shutter speed is required.
ISO
The ISO value determines the sensitivity of the camera's sensor to light. The higher the ISO value, the more sensitive the sensor is to the light falling upon it and the more detail can be captured for a given aperture setting or shutter speed. The ISO value is typically modified in order to preserve a given combination of shutter speed and aperture in lower light situations. Imagine you're taking a wedding shot in a church with subdued lighting. Even with the aperture wide open at say f2.8. you may be left with a shutter speed of 1/15th sec which would risk the introduction of camera shake. Assuming the current ISO value was 100, setting it to 800 would realise a shutterspeed of 1/125th sec as the sensor will be 8 times (3 stops) more sensitive. There is however an important note of caution, increasing the ISO value will increase the amount of "noise" captured in the image. When the ISO value is increased, the sensor, which converts light falling upon it into electrical signals, amplifies those signals. As with all cases of amplification, random noise is amplified with the signal and can become significant (more on this in another post).
Aperture, Shutter speed and ISO are very closely linked. For any given exposure setting, say f5.6 at 1/250th sec at ISO 100, if I vary one of the values up, and another down by the same amount I will maintain the same exposure! Now at this point I need to explain how the width of the opening of a lens and the time it is open or the sensitivity of the sensor can be varied by the "same amount" when they are entirely different parameters. I need to introduce the notion of the "f stop".
Every time I double the amount of light I allow into my camera, I add 1 "stop" to the exposure. Now I can double the amount of light by controling the three values we have just described. If I open the shutter for 1/125th sec instead of 1/250th it is open twice as long so twice as much light enters the camera. I've therefore changed the shutter speed by 1 stop. If I open the aperture wider to f4 (f4 admits twice as much light as f5.6 and an explanation of why can be found here) I have doubled the amount of light that can be collected by the camera for any given shutter speed, I have opened the Aperture by 1 stop. If I double the sensitivity of my sensor say from ISO 100 to 200 I have increased the sensitivity to light by 1 stop. This is pretty cool, I have a single unit of measure that can describe three completely different values. the reality is deceptive, although the parameters are very different, they are all affecting the amount of light captured in an image and it is this value that we are actually varying and measuring. See here for a more complete explanation...
When setting up a shot it is the combination of Aperture, Shutter Speed and ISO values that determine the overall exposure of the image. So how do I decide which settings to use? Firstly, if your camera supports manual override (M) it probably also supports Aperture priority (AV) and Shutter Speed priority (TV). If you set your camera to (M) you probably have a view of your camera's lightmeter in the viewfinder. It's typically the case that the meter represents a good exposure by indicating a point in the middle of a scale. If the meter is pointing to the right of centre, it's suggesting over exposure and if it's to the left, under exposure.
Consider the image of the dragon fly landing on a small, weathered wooden fence. There were a number of considerations driving the choice of settings in this image. firstly, being an unpredictable insect I had to choose a fast shutter speed to stand any chance of capturing a sharp image. Secondly, as I was using a long focal length lens, it has a maximum aperture of f5.6 at full zoom . I therefore had to increase the ISO valuer to 400 in order to get the fast shutter speed I needed for the aperture I was forced to use.
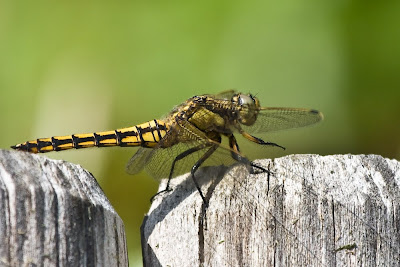
 The combination of settings in this image delivers histogram that acurately positions the highlites to the right and the shadows to the left without an clipping (pixels bunched up at the edges) leading to lost detail.
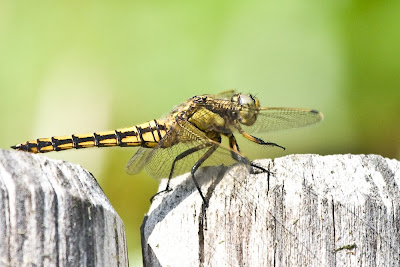
Had I chosen a shutter speed 1 stop slower than the settings above, the image would have been over exposed by 1 stop as in the image below (note the histogram is bunched up to the right hand side with much of the detail beyond the limit of the sensor (clipped) these are the very bright areas of the fence that have no or little detail in them)
 If i'd chosen a shutter speed that was too fast, say 1 stop faster, I would have ended up with the under exposed image below. (note how the pixel distribution has shifeted to the left of the histogram indicating darker tones make up the bulk of the image. We are aslo beginning to lose detail in the legs and the body of the Dragon Fly)
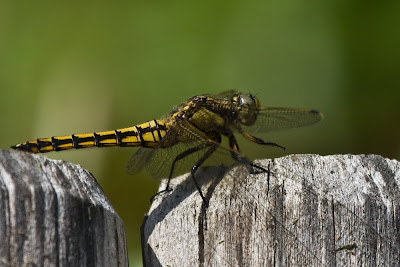
 This image and the choice of settings demonstrate the linkage between the three exposure parameters. In this case, to get the shutter speed I wanted at the maximum aperture I had available to me I actually modified the ISO value!
This was a long post and I have only scratched the surface of this subject. there will be more to come in future posts. In the meantime, try activating the histogram on your camera and watch the effect of different combinations of settings on the histogram and, more importantly, your images.


No comments:
Post a Comment